
Zentic
Thank you for purchasing Zentic! This documentation covers everything you need to install, configure, and customize your template in HTML, React or Next.js. Please read through it before reaching out to support — most common questions are answered here.
Zentic is a premium, AI-powered, multipurpose admin dashboard template built on Bootstrap 5. Beyond a full AI workspace, it bundles complete Ecommerce, CRM, Project Management, and HRM modules — each with its own dashboard, list/detail/add/edit screens, analytics, interactive charts, maps, tables, and forms.
The template ships with a complete Appearance system: light and dark
themes, a full right-to-left (RTL) layout mode, a compact/collapsible sidebar, toggleable
UI animations, and a built-in language switcher — all controllable from the Settings page
or the topbar, and all persisted to localStorage. It is fully responsive,
feature-rich, and available as plain HTML (no build step), a React app and a Next.js app.
Everything below ships in the box — no plugins to buy. Here is a quick overview of what Zentic includes, grouped by category.
After downloading the package from your ThemeForest account and extracting the ZIP, you will see three template folders — one for each technology — plus this documentation and the licence files:
Zentic/
├── html/              HTML edition    — plain HTML / CSS / JS, no build step
├── react/             React Edition Added.
├── nextjs/            Nextjs Edition Added.
├── Documentation/     This documentation (open index.html)
├── LICENSING.txt      Licence information & third-party credits
├── CHANGELOG.txt      Version history
└── README.txt         Quick start for every edition
All three editions contain the same 129 pages, the same design, light/dark mode and LTR/RTL support. Each folder is self-contained — you only need one of them for your project.
| Edition | Folder | Choose it if… | Needs Node.js? |
|---|---|---|---|
| HTML | html/ | You want static pages, a quick prototype, or to plug the markup into PHP, Laravel, Django, .NET or any back-end. | No |
| React | react/ | You are building a single-page app with React and want fast client-side navigation. | Yes (20.19+) |
| Next.js | nextjs/ | You need server rendering, file-based routing, or one-click deployment on Vercel. | Yes (20.9+) |
Jump straight to the guide for your edition: HTML · React · Next.js.
File names below are from the HTML edition; React and Next.js use the same names as routes (for example ai-chat.html becomes /ai-chat). Zentic includes 129 production-ready pages grouped by dashboards, AI workspace, business
modules (Ecommerce, CRM, Project Management, HRM), charts, tables, forms, UI components,
apps, maps, auth screens, and utility pages.
  --- Dashboards & AI ---
  index.html                ← Main / AI Dashboard
  ai-analytics.html         ← AI Analytics
  ai-models.html            ← AI Models
  ai-usage.html              ← AI Usage Stats
  ecommerce-dashboard.html   ← Ecommerce Dashboard
  crm-dashboard.html         ← CRM Dashboard
  project-dashboard.html     ← Project Dashboard
  hr-dashboard.html          ← HR Dashboard

  --- AI Workspace ---
  ai-chat.html               ← AI Chat
  ai-playground.html         ← AI Playground
  ai-agents.html             ← AI Agents
  ai-workflows.html          ← AI Workflows
  ai-prompts.html            ← Prompt Library
  ai-training.html           ← Model Training
  ai-documents.html          ← AI Documents
  ai-api-keys.html           ← API Keys Manager

  --- Apps ---
  calendar.html               ← Calendar
  kanban.html                 ← Kanban Board
  chat.html                   ← Team Chat
  inbox.html                  ← Inbox
  file-manager.html           ← File Manager

  --- Users & Teams ---
  users.html                  ← Users List
  user-detail.html            ← User Detail
  edit-user.html               ← Edit User
  team.html                    ← Team

  --- Finance ---
  invoices.html                ← Invoices List
  invoice.html                 ← Single Invoice
  transactions.html            ← Transactions
  pricing.html                 ← Pricing

  --- Ecommerce ---
  product-list.html            ← Product List
  add-product.html             ← Add Product
  edit-product.html            ← Edit Product
  category-list.html           ← Category List
  add-category.html            ← Add Category
  edit-category.html           ← Edit Category
  order-list.html               ← Orders List
  order-details.html           ← Order Details
  customer-list.html           ← Customer List
  customer-overview.html       ← Customer Overview
  reviews.html                  ← Manage Reviews
  referrals.html                ← Referrals
  ecommerce-settings.html      ← Store Settings

  --- CRM ---
  leads-list.html               ← Leads List
  add-lead.html                 ← Add Lead
  edit-lead.html                ← Edit Lead
  lead-details.html             ← Lead Details
  companies-list.html           ← Company List
  add-company.html              ← Add Company
  edit-company.html             ← Edit Company
  deals-pipeline.html           ← Deals Pipeline
  add-deal.html                 ← Add Deal
  edit-deal.html                ← Edit Deal
  deal-details.html             ← Deal Details

  --- Project Management ---
  projects-list.html            ← Project List
  add-project.html              ← Add Project
  edit-project.html             ← Edit Project
  project-details.html          ← Project Details
  tasks-list.html                ← All Tasks
  add-task.html                  ← Add Task
  edit-task.html                 ← Edit Task
  task-details.html              ← Task Details
  team-workload.html             ← Team Workload

  --- HRM ---
  employees-list.html            ← Employee List
  add-employee.html              ← Add Employee
  edit-employee.html             ← Edit Employee
  employee-details.html          ← Employee Details
  departments-list.html          ← Department List
  add-department.html            ← Add Department
  edit-department.html           ← Edit Department
  attendance.html                 ← Attendance
  leave-requests.html             ← Leave Requests
  payroll-list.html               ← Payroll

  --- Charts ---
  charts-area.html              ← Area Charts
  charts-bar.html                ← Bar & Column Charts
  charts-funnel.html             ← Funnel & Timeline
  charts-heatmap.html            ← Heatmap Charts
  charts-line.html               ← Line Charts
  charts-mixed.html              ← Mixed Charts
  charts-pie.html                 ← Pie & Donut Charts
  charts-radar.html               ← Radar & Polar Area
  charts-scatter.html             ← Scatter & Bubble

  --- Tables ---
  basic-tables.html               ← Basic HTML Tables
  data-tables.html                ← DataTables (jQuery)
  grid-tables.html                ← Grid.js Tables

  --- Forms ---
  basic-forms.html                ← Basic Forms
  advanced-forms.html             ← Advanced Forms
  form-wizard.html                 ← Multi-Step Form Wizard

  --- UI Components ---
  ui-alerts.html                   ← Alerts
  ui-badges.html                   ← Badges
  ui-breadcrumb.html               ← Breadcrumb
  ui-button-group.html             ← Button Groups
  ui-buttons.html                  ← Buttons
  ui-cards.html                    ← Cards
  ui-dropdowns.html                ← Dropdowns
  ui-images.html                   ← Images & Figures
  ui-links.html                     ← Links
  ui-list-group.html               ← List Groups
  ui-navs-tabs.html                ← Navs & Tabs
  ui-pagination.html               ← Pagination
  ui-popovers.html                  ← Popovers
  ui-progress.html                  ← Progress Bars
  ui-spinners.html                  ← Spinners
  ui-toasts.html                    ← Toasts
  ui-tooltips.html                  ← Tooltips
  ui-typography.html                ← Typography

  --- Pages ---
  profile.html                      ← User Profile
  settings.html                     ← Settings (incl. Appearance tab)
  reports.html                      ← Reports
  notifications-page.html           ← Notifications
  timeline.html                     ← Timeline
  gallery.html                      ← Gallery (GLightbox)
  faq.html                           ← FAQ
  changelog.html                     ← Changelog
  search-results.html                ← Search Results
  blank.html                          ← Blank Starter Page
  all-pages.html                      ← All Pages Index

  --- Maps ---
  maps-leaflet.html                   ← Leaflet Interactive Map
  maps-vector.html                    ← Vector Maps

  --- Auth Pages ---
  login.html                          ← Sign In
  signup.html                         ← Sign Up
  forgot-password.html                ← Forgot Password
  reset-password.html                 ← Reset Password
  verify-email.html                   ← Verify Email
  two-factor.html                     ← Two-Factor Auth
  lock-screen.html                    ← Lock Screen

  --- Utility Pages ---
  404.html                            ← 404 Error
  500.html                            ← 500 Error
  coming-soon.html                    ← Coming Soon
  maintenance.html                    ← Maintenance
Plain HTML, CSS and JavaScript on top of Bootstrap 5. No build tools, no package manager — open html/index.html in a browser and it works. Every path below is relative to the html/ folder.
No build tools, no package managers, no compilers. The template is plain HTML/CSS/JS and works straight from the file system.
html/index.html directly
in any modern browser (Chrome, Firefox, Safari, Edge). No local server is needed.
html/
├── index.html                         ← Main / AI Dashboard (start here)
├── [128 other .html pages]            ← See the Pages List above
└── assets/
    ├── css/
    │   ├── zentic.css                 ← Theme styles & CSS variables
    │   ├── zentic-icons.css           ← Lucide icon font classes
    │   ├── fonts/                     ← Icon font files
    │   └── vendor/                    ← Bootstrap (LTR + RTL), DataTables, Leaflet…
    ├── js/
    │   ├── zentic.js                  ← Core JS (sidebar, dark mode, RTL…)
    │   ├── charts.js                  ← Chart.js configurations
    │   ├── *-data.js                  ← Demo data (CRM, Ecommerce, HR, Projects)
    │   └── vendor/                    ← Third-party JS
    └── img/                           ← Logo, avatars, flags, products, gallery
The logo is an SVG image located at:
assets/img/logo.svg
To replace it with your own logo:
assets/img/logo.svg with your own logo file.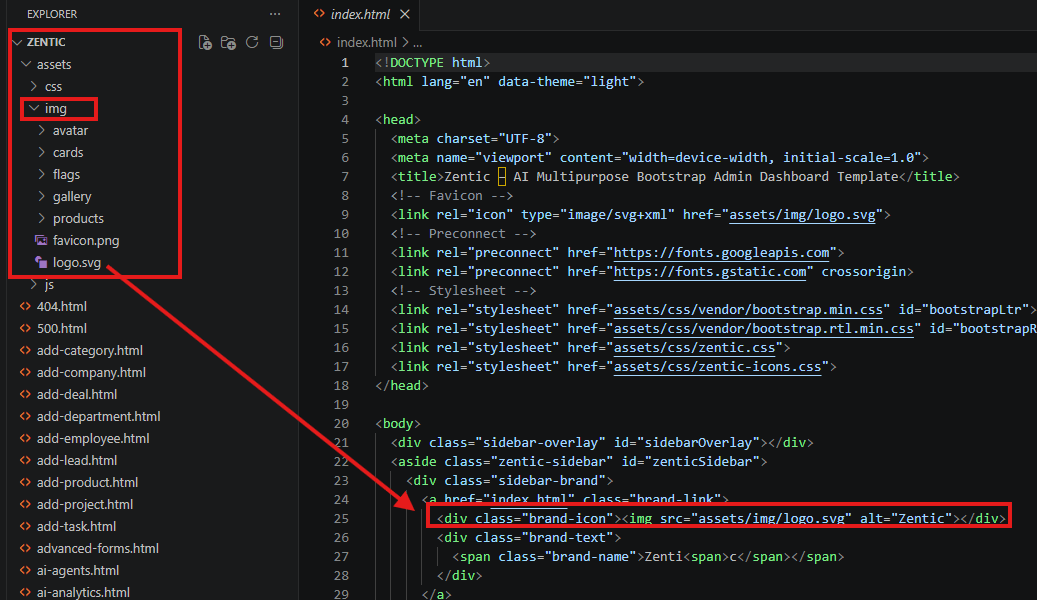
.html file and update
the src attribute on the logo <img> tag.
<link rel="icon">)
on every page — update that tag too if you switch to a raster favicon.
All avatar images are defined as :
assets/img/avatar/your-photo.jpg
assets/img/avatar/ — e.g.
assets/img/avatar/your-photo.jpg.
src attribute to point to your file.
alt attribute to the user's name for accessibility.
.html page where the avatar appears — topbar,
sidebar footer, profile page, and any user cards you wish to update.
Recommended image size: 128 × 128 px minimum, square crop, JPEG or WebP.
The CSS automatically constrains the image to a circle using border-radius: 50%.
All global colors are defined as CSS custom properties (variables) at the top of:
assets/css/zentic.css
Open that file and locate the :root block. The key brand variables are:
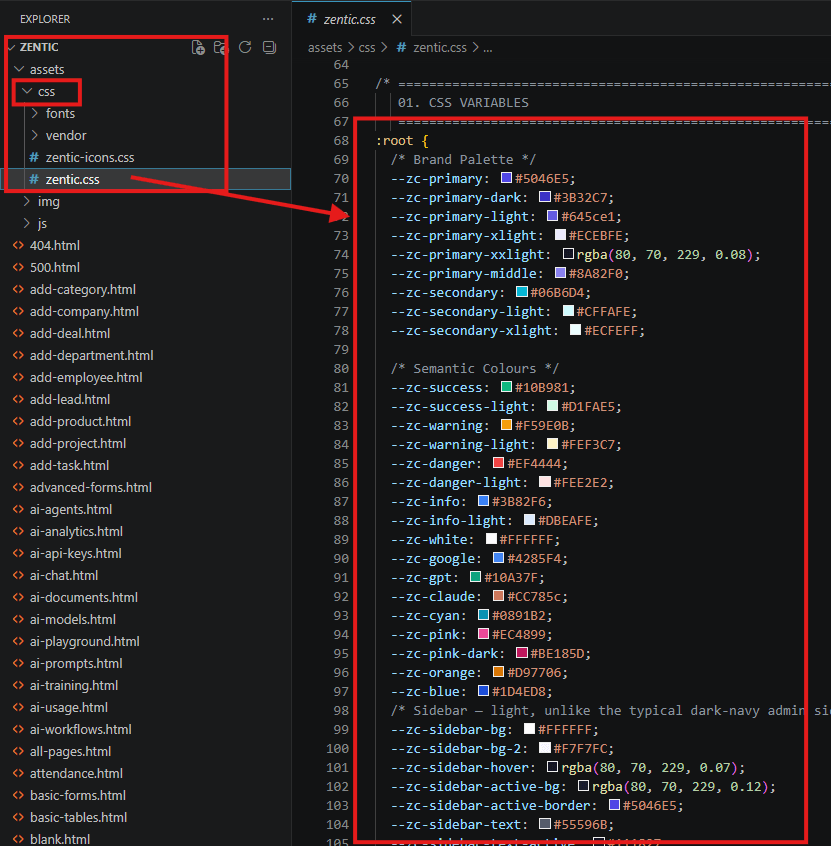
--zc-primary: #5046E5 — main brand color (violet); updates buttons, links,
badges, active nav, and progress bars--zc-secondary: #06B6D4 — accent color (cyan)--zc-sidebar-bg: #FFFFFF — sidebar background--zc-body-bg: #F4F6FA — page background (light mode)--zc-card-bg: #FFFFFF — card background
Changing --zc-primary alone updates every element that references it
site-wide — no need to hunt through individual component styles.
Dark mode colors are controlled via the [data-theme="dark"]
block in the same file. Toggle dark mode at runtime by clicking the moon icon in the
topbar, or press Ctrl+D / Cmd+D. The preference is saved to
localStorage and persists across page reloads.
Tip: The file is organized with a detailed table of contents at the top
— use your editor's Find (Ctrl+F) to jump to any section quickly.
Zentic uses two Google Fonts loaded via @import at the top of
assets/css/zentic.css:
Both fonts are licensed under OFL-1.1 and are free for commercial use. The template works fully offline for all assets except these Google Fonts — see the self-hosting tip below.
To swap in different fonts:
@import url(...) line near the top of
assets/css/zentic.css with the new Google Fonts embed URL.
--zc-font-sans and --zc-font-mono CSS
variables in the :root block to reference your new font names./* Example: swap to Inter + Fira Code */
@import url('https://fonts.googleapis.com/css2?family=Plus+Jakarta+Sans:wght@400;500;600;700;800&family=JetBrains+Mono:wght@400;500&display=swap');
:root {
--zc-font-sans: 'Plus Jakarta Sans', system-ui, -apple-system, sans-serif;
--zc-font-mono: 'JetBrains Mono', 'Fira Code', monospace;
}
For fully offline / self-hosted fonts: Download the font files from
Plus Jakarta Sans
and
JetBrains Mono,
place the .woff2 files in assets/css/fonts/, then replace the
@import with @font-face declarations pointing to those local files.
Zentic uses the Lucide icon set, delivered as a self-hosted icon font — no CDN dependency, no internet required. The icon font files and CSS definitions are already bundled inside the template.
assets/css/zentic-icons.css   ← @font-face + all icon class definitions
assets/css/fonts/
    ├── lucide.woff2           ← Primary (modern browsers)
    ├── lucide.woff            ← Fallback
    ├── lucide.ttf             ← Fallback
    ├── lucide.eot             ← IE legacy
    └── lucide.svg             ← SVG fallback
To use an icon anywhere in the HTML, add the icon class to any element:
<i class="icon-home"></i>
<i class="icon-settings"></i>
<i class="icon-bar-chart-2"></i>
<i class="icon-user"></i>
<i class="icon-bell"></i>
Icon class names follow the Lucide icon name prefixed with icon-:
icon-bar-chart-2icon-file-texticon-calendar
Browse the full icon library at
lucide.dev/icons.
Find the icon you want, copy its name, and prepend icon-.
font-size from their parent element.
Use utility classes or inline style to resize — e.g. style="font-size:1.25rem".
For nav icons, Zentic applies the nav-icon class which sets a consistent size
automatically.
Ctrl+D
(Cmd+D on Mac) — to switch modes instantly.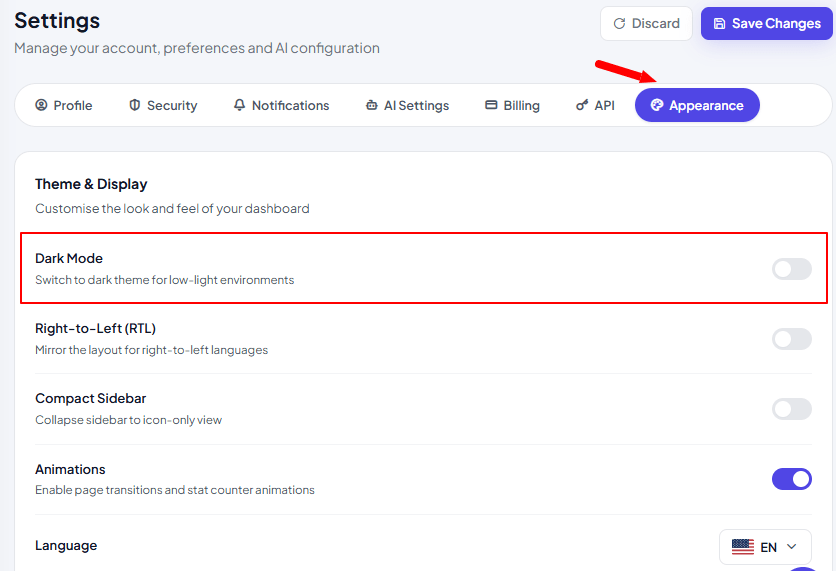
localStorage under
zenticTheme and set as data-theme="light" /
data-theme="dark" on <html>. To adjust the dark colors,
edit the [data-theme="dark"] block in assets/css/zentic.css.
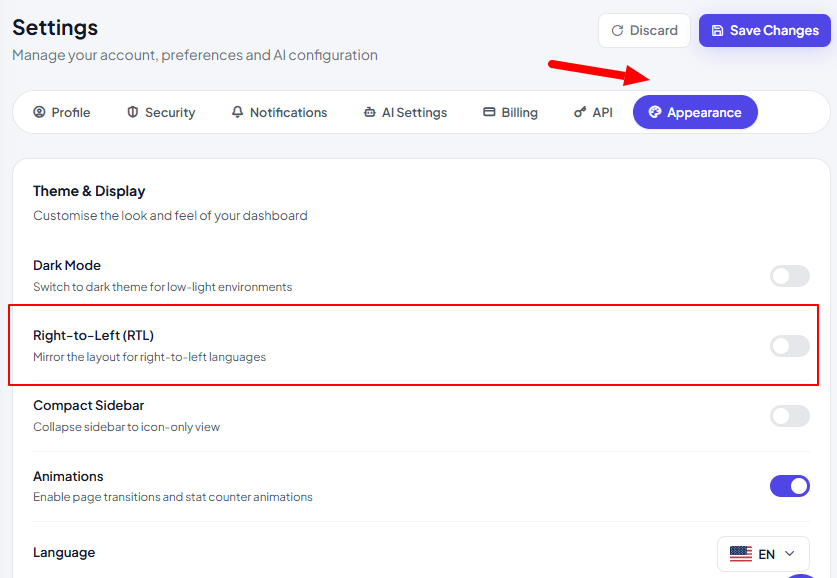
localStorage under
zenticDirection and set as dir="rtl" / dir="ltr" on
<html>. It swaps between two pre-linked stylesheets:
<link rel="stylesheet" href="assets/css/vendor/bootstrap.min.css" id="bootstrapLtr">
<link rel="stylesheet" href="assets/css/vendor/bootstrap.rtl.min.css" id="bootstrapRtl" disabled>
html/ (not the folder itself) into the web root or a sub-folder, e.g. public_html/ or public_html/admin/.Built with React 19, Vite, React Router 7 and Bootstrap 5.3. All 129 pages are code-split and loaded on demand. The build output is a static site that runs on any host.
react/ folder of your download. It is delivered without node_modules and dist — they are created when you run the commands below, which keeps the package small.node -v. Download from nodejs.org.react/ folder.npm install
npm run dev
| Command | Description |
|---|---|
npm run dev | Development server with hot reload (port 3000) |
npm run build | Optimised production build in dist/ |
npm run preview | Preview the production build locally (port 4173) |
npm run lint | ESLint (React Hooks rules) |
npm run format | Format the source with Prettier |
react/
├── index.html                HTML shell: stylesheets, theme/RTL boot script
├── package.json              Dependencies and npm scripts
├── vite.config.js            "@/..." alias → src/, dev server on port 3000
├── vercel.json               SPA fallback for Vercel
├── CREDITS.md                Third-party licences
├── public/
│   ├── assets/css/
│   │   ├── zentic.css        Theme stylesheet (CSS variables at the top)
│   │   ├── zentic-icons.css  Lucide icon font classes (icon-*)
│   │   ├── fonts/            Lucide icon font files
│   │   └── vendor/           Bootstrap (LTR + RTL), DataTables, Grid.js, Leaflet, GLightbox CSS
│   ├── assets/img/           Logo, avatars, flags, payment badges, demo images
│   ├── _redirects            SPA fallback for Netlify
│   └── .htaccess             SPA fallback for Apache / cPanel
└── src/
    ├── main.jsx              Entry: fonts, router, <App />
    ├── App.jsx               Route tree: dashboard layout, full-screen layout, 404
    ├── routes.js             All routes: path, page title, layout, lazy-loaded page
    ├── layouts/              DashboardLayout (sidebar + topbar), FullPageLayout
    ├── pages/
    │   ├── dashboard/        Pages with sidebar + topbar (IndexPage.jsx, UsersPage.jsx…)
    │   └── fullpage/         Login, signup, errors, maintenance, coming soon, AI chat…
    ├── components/
    │   ├── PageInit.jsx      Activates a page's interactive widgets
    │   ├── PageTitle.jsx     Sets the browser tab title
    │   └── layout/           Sidebar, Topbar, Footer, BackToTop, ShellInit
    ├── data/menu.js          Sidebar menu definition
    ├── lib/zentic/
    │   ├── runtime.js        Loads libraries on demand; runs init + cleanup per route
    │   ├── core.js           Template behaviour (sidebar, topbar, modals, toasts, widgets)
    │   ├── charts.js         Chart.js chart definitions
    │   └── stores/           Demo data (localStorage) for CRM, eCommerce, HR, projects
    └── styles/app.css        Small React integration helper
Each page is a component in src/pages/, registered in src/routes.js and loaded on demand. The sidebar lists every page; /all-pages shows them all in one place.
| Group | Routes |
|---|---|
| Dashboards | /, /ai-analytics, /ai-models, /ai-usage, /ecommerce-dashboard, /crm-dashboard, /project-dashboard, /hr-dashboard |
| AI workspace | /ai-chat, /ai-playground, /ai-agents, /ai-workflows, /ai-prompts, /ai-training, /ai-documents, /ai-api-keys |
| Apps | /calendar, /kanban, /chat, /inbox, /file-manager |
| eCommerce, CRM, Projects, HRM | List, add, edit and detail pages, e.g. /product-list, /leads-list, /projects-list, /employees-list |
| Components | /ui-*, /charts-*, /basic-tables, /data-tables, /grid-tables, /maps-*, /basic-forms, /advanced-forms, /form-wizard |
| Auth & errors | /login, /signup, /forgot-password, /reset-password, /verify-email, /two-factor, /lock-screen, /error-404, /error-500, /maintenance, /coming-soon |
src/pages/dashboard/BlankPage.jsx to src/pages/dashboard/Reports2025Page.jsx and rename the component.src/routes.js (a lazy import plus a route entry).src/data/menu.js (see Sidebar Menu).// src/routes.js
Reports2025Page: lazy(() => import("./pages/dashboard/Reports2025Page")),
// …
{ path: "/reports-2025", title: "Reports 2025", layout: "dashboard", Component: page.Reports2025Page },
// src/pages/dashboard/Reports2025Page.jsx
import PageInit from "@/components/PageInit";

export default function Reports2025Page() {
  return (
    <div className="zentic-page">
      <div className="page-header">
        <h1 className="page-title">Reports 2025</h1>
      </div>
      {/* your content */}
      <PageInit />
    </div>
  );
}
<div className="zentic-page"> and the closing <PageInit />. The wrapper lets React Router swap pages cleanly; PageInit switches on charts, modals, toasts and tooltips for that page and removes them when you leave it.For a full-screen page without sidebar (for example a new auth screen), put it in src/pages/fullpage/ and use layout: "fullpage". Use <Link to="/users"> from react-router-dom for links between pages.
The sidebar is generated from src/data/menu.js. Sections contain items; an item is either a link or a dropdown.
{
  label: "Reports",
  items: [
    { label: "Overview", icon: "chart-pie", href: "/reports" },
    { label: "AI Chat", icon: "message-circle", href: "/ai-chat",
      badge: { text: "AI", className: "ai-badge" } },
    { label: "Exports", icon: "download", children: [
      { label: "CSV", href: "/exports/csv" },
      { label: "PDF", href: "/exports/pdf" },
    ] },
  ],
}
icon is any Lucide icon name (without the icon- prefix) that exists in public/assets/css/zentic-icons.css. Sections with alwaysOpen: true start expanded; the others expand when they contain the current page.
Interactive widgets are plain-JavaScript libraries activated by <PageInit />. Bootstrap's JS (dropdowns, tooltips, modals) and Chart.js are always available. Heavier libraries load only on the pages that ask for them:
<PageInit libs={["datatables"]} />   // jQuery + DataTables
<PageInit libs={["gridjs"]} />       // Grid.js
<PageInit libs={["leaflet"]} />      // Leaflet maps
<PageInit libs={["glightbox"]} />    // GLightbox image viewer
Charts are defined in src/lib/zentic/charts.js and attach to a <canvas> by id. To add one, place a canvas in your page and add a block to that file:
onChartsReady(function () {
  const canvas = document.getElementById("myRevenueChart");
  if (!canvas) return;
  new Chart(canvas, { type: "bar", data: { labels: ["Q1", "Q2"], datasets: [{ data: [12, 19] }] } });
});
Charts are destroyed automatically when you navigate away.
List tables are wired in src/lib/zentic/core.js by table id (search for wireListTable). To make a new table interactive, give it an id, call window.initDataTable("myTable") inside an onPageReady block, and add libs={["datatables"]} to the page's PageInit.
Many buttons work through data attributes, so you can use them without writing JavaScript:
| Markup | Effect |
|---|---|
data-action="toast" data-type="success" data-msg="Saved!" data-icon="circle-check" | Shows a toast |
data-modal="myModal" | Opens <div className="zentic-modal-backdrop" id="myModal"> |
data-action="confirm" data-confirm="Delete?" | Confirm dialog, then toast |
data-action="copy" data-copy="text" | Copies text to the clipboard |
data-bs-toggle="tooltip" title="…" | Bootstrap tooltip |
From your own client components you can also call window.showToast(type, message, icon) and window.openModal(id).
All design tokens are CSS variables at the top of public/assets/css/zentic.css:
:root {
  --zc-primary: #5046E5;
  --zc-font-sans: 'Plus Jakarta Sans', system-ui, -apple-system, sans-serif;
  /* … */
}
[data-theme="dark"] {
  /* dark-mode overrides */
}
--zc-primary (and its -light / -dark variants) to rebrand the whole template.src/main.jsx. To use a different font, install its @fontsource/… package, import it there, and update --zc-font-sans.public/assets/img/logo.svg and the brand text in src/components/layout/Sidebar.jsx.<i className="icon-home"></i>. Browse names at lucide.dev/icons and prefix them with icon-.Ctrl+D / Cmd+D). The choice is saved in localStorage under zenticTheme and applied before the first paint, so there is no flash.dir="rtl" on <html>; the choice is saved under zenticDirection.dir="rtl" in index.html and change 'ltr' to 'rtl' in the boot script there.CRM, eCommerce, HR and project dashboards read demo records from small stores in src/lib/zentic/stores/, seeded into the browser's localStorage. Replace them with calls to your API when you connect a backend. Clear the site data in your browser to reset the demo.
npm run build
npm run preview.dist/ folder to your host (Vercel, Netlify, S3, cPanel, GitHub Pages…)./users with index.html. This is already set up for Vercel (vercel.json), Netlify (public/_redirects) and Apache / cPanel (public/.htaccess). For Nginx add try_files $uri /index.html;.Deploy to the root of a domain or subdomain (for example admin.example.com). Asset paths start with /assets/, so hosting inside a sub-folder needs those paths and Vite's base option changed.
Maps in production: the Leaflet demo uses public tile servers (OpenStreetMap, OpenTopoMap, Esri). For a live product, use your own or a commercial tile provider and keep the attribution visible.
Zentic keeps one proven code path for its widgets (Chart.js, DataTables, Leaflet…) shared with the HTML edition. The runtime starts that code when a page mounts and fully cleans it up when you leave, so navigation stays fast and leak-free. You are free to replace any widget with a React library of your choice.
Strict Mode mounts components twice in development, which would initialise the plain-JS widgets twice. It does not affect production. You can wrap your own React-only components in <StrictMode>; see the note in src/main.jsx.
Only the DataTables pages load jQuery, and only on those pages. If you remove DataTables you can uninstall jquery and datatables.net-bs5.
Yes. Vite supports TypeScript out of the box: add a tsconfig.json, install typescript, and rename files to .tsx as you go.
Run node -v and compare it with the requirements above. Upgrade Node.js, delete the node_modules folder if it exists, and run npm install again.
Close the other app using port 3000, or start on another port. For React use npm run dev -- --port 3001.
Built with Next.js (App Router), React 19 and Bootstrap 5.3. All 129 pages are separate routes. Deploy as a Node.js app (Vercel) or export to plain static HTML.
nextjs/ folder of your download. It is delivered without node_modules and .next — they are created when you run the commands below, which keeps the package small.node -v. Download from nodejs.org.nextjs/ folder.npm install
npm run dev
| Command | Description |
|---|---|
npm run dev | Development server with hot reload (port 3000) |
npm run build | Optimised production build |
npm run start | Serve the production build (run build first) |
npm run lint | ESLint with the Next.js core-web-vitals rules |
npm run format | Format the source with Prettier |
nextjs/
├── package.json              Dependencies and npm scripts
├── next.config.mjs           Next.js settings (static export switch inside)
├── eslint.config.mjs
├── jsconfig.json             "@/..." import alias → src/
├── CREDITS.md                Third-party licences
├── public/assets/
│   ├── css/
│   │   ├── zentic.css        Theme stylesheet (CSS variables at the top)
│   │   ├── zentic-icons.css  Lucide icon font classes (icon-*)
│   │   ├── fonts/            Lucide icon font files
│   │   └── vendor/           Bootstrap (LTR + RTL), DataTables, Grid.js, Leaflet, GLightbox CSS
│   └── img/                  Logo, avatars, flags, payment badges, demo images
└── src/
    ├── app/
    │   ├── layout.jsx        Root layout: stylesheets, metadata, theme/RTL boot script
    │   ├── not-found.jsx     404 page for unknown URLs
    │   ├── (dashboard)/      Pages with sidebar + topbar
    │   │   ├── layout.jsx
    │   │   ├── page.jsx      /  (Main Dashboard)
    │   │   └── <route>/page.jsx
    │   └── (fullpage)/       Login, signup, errors, maintenance, coming soon, AI chat…
    ├── components/
    │   ├── PageInit.jsx      Activates a page's interactive widgets
    │   └── layout/           Sidebar, Topbar, Footer, BackToTop, ShellInit
    ├── data/menu.js          Sidebar menu definition
    ├── lib/zentic/
    │   ├── runtime.js        Loads libraries on demand; runs init + cleanup per route
    │   ├── core.js           Template behaviour (sidebar, topbar, modals, toasts, widgets)
    │   ├── charts.js         Chart.js chart definitions
    │   └── stores/           Demo data (localStorage) for CRM, eCommerce, HR, projects
    └── styles/nextjs.css     Small Next.js integration helper
(dashboard), (fullpage) — are Next.js route groups. They choose the layout but do not appear in the URL: src/app/(dashboard)/users/page.jsx is served at /users.Each page is a React Server Component in its own folder. The sidebar lists every page; /all-pages shows them all in one place.
| Group | Routes |
|---|---|
| Dashboards | /, /ai-analytics, /ai-models, /ai-usage, /ecommerce-dashboard, /crm-dashboard, /project-dashboard, /hr-dashboard |
| AI workspace | /ai-chat, /ai-playground, /ai-agents, /ai-workflows, /ai-prompts, /ai-training, /ai-documents, /ai-api-keys |
| Apps | /calendar, /kanban, /chat, /inbox, /file-manager |
| eCommerce, CRM, Projects, HRM | List, add, edit and detail pages, e.g. /product-list, /leads-list, /projects-list, /employees-list |
| Components | /ui-*, /charts-*, /basic-tables, /data-tables, /grid-tables, /maps-*, /basic-forms, /advanced-forms, /form-wizard |
| Auth & errors | /login, /signup, /forgot-password, /reset-password, /verify-email, /two-factor, /lock-screen, /error-404, /error-500, /maintenance, /coming-soon |
src/app/(dashboard)/blank/ to a new folder, e.g. src/app/(dashboard)/reports-2025/.page.jsx, rename the component and set metadata.title.src/data/menu.js (see Sidebar Menu).import PageInit from "@/components/PageInit";
export const metadata = { title: "Reports 2025" };
export default function Reports2025Page() {
return (
<div className="zentic-page">
<div className="page-header">
<h1 className="page-title">Reports 2025</h1>
</div>
{/* your content */}
<PageInit />
</div>
);
}
<div className="zentic-page"> and the closing <PageInit />. The wrapper lets Next.js swap pages cleanly; PageInit switches on charts, modals, toasts and tooltips for that page and removes them when you leave it.For a full-screen page without sidebar (for example a new auth screen), create it under src/app/(fullpage)/ instead.
The sidebar is generated from src/data/menu.js. Sections contain items; an item is either a link or a dropdown.
{
  label: "Reports",
  items: [
    { label: "Overview", icon: "chart-pie", href: "/reports" },
    { label: "AI Chat", icon: "message-circle", href: "/ai-chat",
      badge: { text: "AI", className: "ai-badge" } },
    { label: "Exports", icon: "download", children: [
      { label: "CSV", href: "/exports/csv" },
      { label: "PDF", href: "/exports/pdf" },
    ] },
  ],
}
icon is any Lucide icon name (without the icon- prefix) that exists in public/assets/css/zentic-icons.css. Sections with alwaysOpen: true start expanded; the others expand when they contain the current page.
Interactive widgets are plain-JavaScript libraries activated by <PageInit />. Bootstrap's JS (dropdowns, tooltips, modals) and Chart.js are always available. Heavier libraries load only on the pages that ask for them:
<PageInit libs={["datatables"]} />   // jQuery + DataTables
<PageInit libs={["gridjs"]} />       // Grid.js
<PageInit libs={["leaflet"]} />      // Leaflet maps
<PageInit libs={["glightbox"]} />    // GLightbox image viewer
Charts are defined in src/lib/zentic/charts.js and attach to a <canvas> by id. To add one, place a canvas in your page and add a block to that file:
onChartsReady(function () {
  const canvas = document.getElementById("myRevenueChart");
  if (!canvas) return;
  new Chart(canvas, { type: "bar", data: { labels: ["Q1", "Q2"], datasets: [{ data: [12, 19] }] } });
});
Charts are destroyed automatically when you navigate away.
List tables are wired in src/lib/zentic/core.js by table id (search for wireListTable). To make a new table interactive, give it an id, call window.initDataTable("myTable") inside an onPageReady block, and add libs={["datatables"]} to the page's PageInit.
Many buttons work through data attributes, so you can use them without writing JavaScript:
| Markup | Effect |
|---|---|
data-action="toast" data-type="success" data-msg="Saved!" data-icon="circle-check" | Shows a toast |
data-modal="myModal" | Opens <div className="zentic-modal-backdrop" id="myModal"> |
data-action="confirm" data-confirm="Delete?" | Confirm dialog, then toast |
data-action="copy" data-copy="text" | Copies text to the clipboard |
data-bs-toggle="tooltip" title="…" | Bootstrap tooltip |
From your own client components you can also call window.showToast(type, message, icon) and window.openModal(id).
All design tokens are CSS variables at the top of public/assets/css/zentic.css:
:root {
  --zc-primary: #5046E5;
  --zc-font-sans: 'Plus Jakarta Sans', system-ui, -apple-system, sans-serif;
  /* … */
}
[data-theme="dark"] {
  /* dark-mode overrides */
}
--zc-primary (and its -light / -dark variants) to rebrand the whole template.src/app/layout.jsx. To use a different font, install its @fontsource/… package, import it there, and update --zc-font-sans.public/assets/img/logo.svg and the brand text in src/components/layout/Sidebar.jsx.<i className="icon-home"></i>. Browse names at lucide.dev/icons and prefix them with icon-.Ctrl+D / Cmd+D). The choice is saved in localStorage under zenticTheme and applied before the first paint, so there is no flash.dir="rtl" on <html>; the choice is saved under zenticDirection.dir="rtl" in src/app/layout.jsx and change 'ltr' to 'rtl' in the boot script there.CRM, eCommerce, HR and project dashboards read demo records from small stores in src/lib/zentic/stores/, seeded into the browser's localStorage. Replace them with calls to your API when you connect a backend. Clear the site data in your browser to reset the demo.
npm run build
npm run start   # serves on port 3000 (set PORT to change)
On Vercel, import the nextjs/ folder as a project; Next.js is detected automatically.
next.config.mjs uncomment:
output: "export",
images: { unoptimized: true },/users to users.html automatically (Apache, cPanel, plain S3), also uncomment trailingSlash: true so each page is written as users/index.html.npm run build.out/ folder to your host.Maps in production: the Leaflet demo uses public tile servers (OpenStreetMap, OpenTopoMap, Esri). For a live product, use your own or a commercial tile provider and keep the attribution visible.
Zentic keeps one proven code path for its widgets (Chart.js, DataTables, Leaflet…) shared with the HTML edition. The runtime starts that code when a page mounts and fully cleans it up when you leave, so navigation stays fast and leak-free. You are free to replace any widget with a React library of your choice.
Strict Mode mounts components twice in development, which would initialise the plain-JS widgets twice. It does not affect production. You can turn it back on in next.config.mjs for your own React-only pages.
Only the DataTables pages load jQuery, and only on those pages. If you remove DataTables you can uninstall jquery and datatables.net-bs5.
Yes. Rename files to .tsx and run npm run dev; Next.js creates tsconfig.json for you.
Run node -v and compare it with the requirements above. Upgrade Node.js, delete the node_modules folder if it exists, and run npm install again.
Close the other app using port 3000, or start on another port. For Next.js use npm run dev -- -p 3001.
Zentic is sold on ThemeForest under the Envato Market licence you purchased. Your licence applies to all three editions (HTML, React and Next.js) in this package.
The complete terms are at themeforest.net/licenses/standard. If this summary and the official licence differ, the official licence wins.
Third-party libraries, fonts and icons keep their own open-source licences (MIT, BSD-2-Clause, ISC, SIL OFL) — see Sources & Credits, LICENSING.txt, and CREDITS.md inside react/ and nextjs/.
Zentic is built with a minimal dependency footprint. We thank the creators of the open-source resources listed below. All assets are used under their respective licenses.
Zentic bundles all vendor libraries locally — no CDN, no external requests required.
All custom interactions are handled by a small set of hand-written files:
Thank you for choosing Zentic! We hope this documentation helps you set up and customize the template quickly and with confidence.
If you run into anything not covered here, our support team is ready to help.
Submit a support
ticket
and we will respond within 24–48 hours (usually sooner).
Support hours: Monday – Friday, 10:00 AM – 7:00 PM IST.
Before submitting a ticket, please:
We are committed to making your experience great. Thank you again for your purchase!
Our team can adapt Zentic to your exact requirements — whichever edition you use.
Thank you for choosing Zentic! We hope this template helps you build your application faster. If you enjoy it, please share your feedback by leaving a rating on ThemeForest — it means a lot to us.
Leave a Review